Validate files in Linux using MD5 checksum

You can use MD5 checksum to validate the integrity of a file that may have been corrupted or tampered with. Possibly while downloading/uploading the file you will need to check the validity of the file.

Most of the download sites also provide a MD5 checksum along with the download which can be used for validation of download.

This method is also useful when you are transferring files across different hosts.

GENERATE THE MD5 CHECKSUM

# md5sum <file_name>

Ex:

# md5sum test.sh

OUTPUT:
# 7fca3f2f1689973efce688be46193aff test.sh

You can also specify multiple files

# md5sum <file_name_1> <file_name_2> ...

Redirecting output to a file:

# md5sum <file_name> >> md5.txt

VALIDATING THE MD5 CHECKSUM

Using output file (running from the same directory)

# md5sum -c md5.txt

OUTPUT:
# test.sh: OK
Increasing Disk Space in VirtualBox (Ubuntu)

There can be times when you need to increase the size of the VirtualBox VDI Image.

Changing the size of the image doesn’t automatically extends the primary partition. This is a two step process:

Note: It’s advisable to take a backup of the existing image first.

Step 1: Extending the Image Size

This can be done using the VBoxManage utility which is shipped with VirtualBox installation. In my case, my VDI was 20GB in size and I wanted to expand it to 30GB

C:\Program Files\Oracle\VirtualBox>VBoxManage.exe modifyhd "C:\Users\arpit\VirtualBox VMs\Ubuntu\Ubuntu.vdi" --resize 30720

Step 2: Extending Primary partition in Ubuntu

You can use gparted to extend the primary partition in Ubuntu.
Download Gparted for Ubuntu : Download Link

Alternatively: You can install gparted in Ubuntu using a package manager.

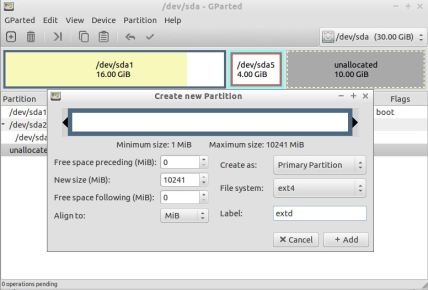
In Gparted, you will be able to see the unallocated space, select that and create a new partition

gparted unallocated space

You will need to mount it in fstab. Update /etc/fstab and run mount -a to reload the fstab entries.

My fstab entry looks like this:

# New Partition
UUID=907f3b69-e891-4a3c-99c1-f0aa2838e3b3 /apps	ext4    errors=remount-ro 0       2

Tip: Maven – “webxml attribute is required” Error

Using web.xml can be tricky sometimes with Maven.

The Correct location of web.xml: project\src\main\webapp\WEB-INF\web.xml

PROBLEM:

Although, maven should be automatically picking up this file (Convention Over Configuration right?) but most of the times it fails to do so and burps out this ERROR:

Error assembling WAR: webxml attribute is required (or pre-existing WEB-INF/web.xml if executing in update mode)

SOLUTION:

May looks annoying, but try specifying the location explicitly and it works…

<plugin>
  <groupId>org.apache.maven.plugins</groupId>
  <artifactId>maven-war-plugin</artifactId>
  <configuration>
    <webXml>src\main\webapp\WEB-INF\web.xml</webXml>
  </configuration>
</plugin>

Embed Subtitles in AVI files (for viewing in TV / DVD)

Well, most of the new TV’s and DVD’s players have the capability of playing an AVI / DIVX file through a disk or a usb drive.

Although, they are capable fo displaying the subtitles, BUT ONLY IF THE SUBTITLES ARE EMBEDDED IN THE MOVIE.

** I know there are a lot of tools and blogs about how to do this, well … This tool is the fastest of ’em all. 🙂

STEP 1 – Find the Subtitles for your movie

There are a lot of online sources to get the subtitles, I would personally recommend Subscene. Search for the appropriate subtitle and download.

Tip: Before jumping further, Do give the subtitle a test run to make sure that it’s in sync with the Movie.

Step 2 – Download AVIAddXSubs

Step 3 – Configuration

Well, this step can be omitted if you are in real hurry, but I would recommend to change the font settings before mixing the subtitle and video, since the original font is very big and unpleasant to the eyes. 😉

Step 4 – Mixing

  • Open AVIAddXSubs
  • Save the Movie and the Subtitle file with the same name in a folder
    Eg;
    Sample.avi
    Sample.srt
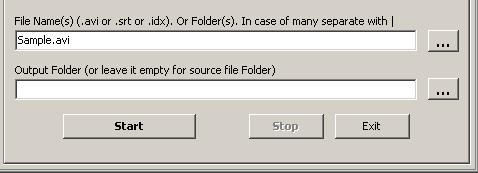
  • Select the movie file and the output folder (leave blank if you need the output in same directory)

Hit START !!

It usually takes 8-10 minutes for a typical 700MB avi file !

Enjoy…

Adding Multiple Agents in TeamCity

Adding Multiple TeamCity agents running on the same server.

By default, when you install TeamCity, it gives you the option to install a Server and an Agent.

To add more agents:-

Login into the Server running TeamCity (TC) and open TC UI in the browser. Click on the Agents Tab

On the right hand side, Click on Install Build Agents > MS Windows Installer

Run the Agent Installer, Choose the directory where you want to install the agent (configuration)

** Make Sure this is a seperate directory from the previously installed agent.

Finally, in the agent configuration section –

> Edit the ownPort – Should not conflict with the already running agent’s port.

> Edit the serverUrl – Should point to the TC server URL

Click on Save.

IMP: When the pop-up comes, do not click on OK!

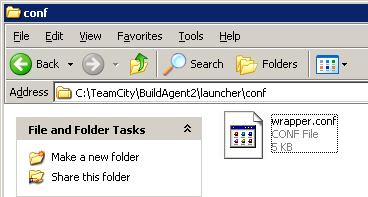
Open the Explorer and go to the \launcher\conf path in the Agent installation directory you configured above.

Each Agent is registered as a windows NT service and should have a unique name, otherwise, only one agent will connect at a time.

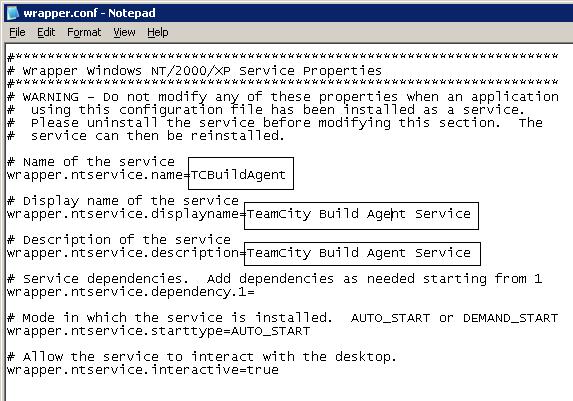
Open wrapper.conf and scroll till the end to the Wrapper Windows NT/2000/XP Service Properties

Change the properties highlighted below!

Now you can go back to the pop-up and click OK.

Continue with the rest of the installation process, and the Agent should be installed as a seperate service and visible under TeamCity UI.

Cheers!